Movie reaction Sentiment Analysis using CNN (Naver Movie)
Reference & Purpose
- 네이버 무비 감상형 데이터셋을 통해 영화평에 대한 긍정.부정 을 평가합니다.
- 데이터 크롤링 부분은 다른 포스트에서 별도로 다룹니다
여기서는 train,val,test 이미 구해진 Data를 활용합니다.
import numpy as np
import tensorflow as tf
import json
tf.__version__
'2.1.0'
with open("D:/★2020_ML_DL_Project/Alchemy/dataset/text_output/Sentiment_train.json") as f:
    train = json.loads(f.read())
with open("D:/★2020_ML_DL_Project/Alchemy/dataset/text_output/Sentiment_val.json") as f:
    val = json.loads(f.read())
with open("D:/★2020_ML_DL_Project/Alchemy/dataset/text_output/Sentiment_test.json") as f:
    test = json.loads(f.read())
print(len(train), len(val), len(test))
print(type(train),type(val),type(test))
50000 10000 10000
<class 'list'> <class 'list'> <class 'list'>
Data 파악하기
- list 안의 list 로 2중 list 구조임
- ‘1458790’, ‘허우 샤오시엔 작품은 모두 만점!’, ‘긍정’ index=2가 label정보임을 알 수 있음
test[0]
['1458790', '허우 샤오시엔 작품은 모두 만점!', '긍정']
토크나이징과 단어사전만들기
만들어진 단어사전으로, padding된 데이터로 변환하기
상기 과정은 하기의 Colab에서 수행되었습니다.
colab 수행과정 코드
## colab으로 수행된 벡터가져오기
with open("D:/★2020_ML_DL_Project/Alchemy/dataset/text_output/naver_m_train_lst.json") as f:
    train_input_lst = json.loads(f.read())
with open("D:/★2020_ML_DL_Project/Alchemy/dataset/text_output/naver_m_train_label.json") as f:
    train_labels = json.loads(f.read())
with open("D:/★2020_ML_DL_Project/Alchemy/dataset/text_output/naver_m_val_lst.json") as f:
    val_input_lst = json.loads(f.read())
with open("D:/★2020_ML_DL_Project/Alchemy/dataset/text_output/naver_m_val_label.json") as f:
    val_labels = json.loads(f.read())
with open("D:/★2020_ML_DL_Project/Alchemy/dataset/text_output/naver_m_test_lst.json") as f:
    test_input_lst = json.loads(f.read())
with open("D:/★2020_ML_DL_Project/Alchemy/dataset/text_output/naver_m_test_label.json") as f:
    test_labels = json.loads(f.read())
with open("D:/★2020_ML_DL_Project/Alchemy/dataset/text_output/naver_m_voca_list.json") as f:
    voca_list = json.loads(f.read())
print(len(train_input_lst))
print(train_input_lst[2])
print(train_labels[2])
50000
[16836, 178, 101, 10]
0
print(len(voca_list))
38726
label_map = {'부정':0,'긍정':1}
길이가 일정한 문장으로 length를 맞춰준다.
from tensorflow.keras.preprocessing.sequence import pad_sequences

## 길이가 일정한 문장으로 만들기
## """ max_seq_len을 넘는 문장은 절단, 모자르는 것은 PADDING """

max_seq_len = 150
train_ids = pad_sequences(train_input_lst,maxlen=max_seq_len,padding="post",truncating="pre")
val_ids = pad_sequences(val_input_lst,maxlen=max_seq_len,padding="post",truncating="pre")
test_ids = pad_sequences(test_input_lst,maxlen=max_seq_len,padding="post",truncating="pre")
print(train[11])
print(train_input_lst[11],"\n seuquence before: {}".format(len(train_input_lst[11])))
print("="*100)
print(train_ids[11],"\n seuquence after: {}".format(len(train_ids[11])))
['6950777', '역시 미셸 오슬로네요~ 이 작품은 꼭 극장에서 큰 스크린으로 봐야할듯해요~ 한번 더봐야지~*', '긍정']
[190, 8891, 10379, 60, 135, 33, 3, 128, 14, 220, 352, 57, 280, 5, 1708, 45, 9, 162, 4, 21, 114, 4, 53, 33, 94, 134, 96, 9, 683, 33, 632]
 seuquence before: 31
====================================================================================================
[  190  8891 10379    60   135    33     3   128    14   220   352    57
   280     5  1708    45     9   162     4    21   114     4    53    33
    94   134    96     9   683    33   632     0     0     0     0     0
     0     0     0     0     0     0     0     0     0     0     0     0
     0     0     0     0     0     0     0     0     0     0     0     0
     0     0     0     0     0     0     0     0     0     0     0     0
     0     0     0     0     0     0     0     0     0     0     0     0
     0     0     0     0     0     0     0     0     0     0     0     0
     0     0     0     0     0     0     0     0     0     0     0     0
     0     0     0     0     0     0     0     0     0     0     0     0
     0     0     0     0     0     0     0     0     0     0     0     0
     0     0     0     0     0     0     0     0     0     0     0     0
     0     0     0     0     0     0]
 seuquence after: 150
print(train_labels[11])
1
상기 결과처럼. 뒷부분이 padding 된 사실을 알 수 있습니다.
모델설계하기
## 쌓여있는 불필요한 것들을 삭제
import tensorflow as tf
tf.keras.backend.clear_session()
from tensorflow.keras import Sequential
from tensorflow.keras.layers import Embedding, LSTM, GRU, Dense, Conv1D, GlobalMaxPooling1D, Input
print(len(voca_list))
print(train_ids.shape[1])
38726
150
vocab_size = len(voca_list) # 단어사전 개수 (네이버 무비 train,val,test 전체를 합쳐서 만든 voca 사전이다.)
embedding_dim = 128 # 임베딩 차원
cnn_filters = [2,3,4]
num_feature_map = 64
input_length = train_ids.shape[1]


## Input Layer 정의하기 (Hint: tf.keras.layers.Input)
text_input_ = tf.keras.layers.Input(shape = (None,),dtype='int32',name='text')

## Input Layer에 Embedding Layer 연결하기
embedding = tf.keras.layers.Embedding(vocab_size,embedding_dim,input_length=input_length)(text_input_)
print("shape after embedding:", embedding.shape, "\n") ## 3차원 output (batch,input_length,32)

## CNN filter 적용하기
## 임베딩된 벡터에 CNN 필터 [3,4,5,6]을 각각 적용하고 MaxPooling을 적용하기
result_cnns = []
for i, kernel in enumerate(cnn_filters):
    temp = Conv1D(filters = num_feature_map,kernel_size = kernel, activation='relu')(embedding)
    print("Apply CNN filter {}. Convolution shape: {}".format(kernel,temp.shape)) ## Sequent length - kernel_size + 1
    temp = GlobalMaxPooling1D()(temp)
    print(".. shape after Max Pooling:", temp.shape)
    result_cnns.append(temp)

## 만들어진 feature map들을 concatenate하기
x = tf.keras.layers.concatenate(result_cnns, axis=-1)
print("\nshape after concat   :", x.shape)

## 긍정/부정 분류하는 FCN 연결하기
## Dense layer를 이용해 긍정/부정 카테고리에 해당하는 점수 만들기
labels = Dense(2, activation="softmax")(x)
shape after embedding: (None, None, 128)

Apply CNN filter 2. Convolution shape: (None, None, 64)
.. shape after Max Pooling: (None, 64)
Apply CNN filter 3. Convolution shape: (None, None, 64)
.. shape after Max Pooling: (None, 64)
Apply CNN filter 4. Convolution shape: (None, None, 64)
.. shape after Max Pooling: (None, 64)

shape after concat   : (None, 192)
naver_movie_CNN = tf.keras.Model(inputs=text_input_, outputs = labels)
tf.keras.utils.plot_model( naver_movie_CNN , to_file='model.png', show_shapes=True)
Failed to import pydot. You must install pydot and graphviz for `pydotprint` to work.
naver_movie_CNN.summary()
Model: "model"
__________________________________________________________________________________________________
Layer (type)                    Output Shape         Param #     Connected to
==================================================================================================
text (InputLayer)               [(None, None)]       0
__________________________________________________________________________________________________
embedding (Embedding)           (None, None, 128)    4956928     text[0][0]
__________________________________________________________________________________________________
conv1d (Conv1D)                 (None, None, 64)     16448       embedding[0][0]
__________________________________________________________________________________________________
conv1d_1 (Conv1D)               (None, None, 64)     24640       embedding[0][0]
__________________________________________________________________________________________________
conv1d_2 (Conv1D)               (None, None, 64)     32832       embedding[0][0]
__________________________________________________________________________________________________
global_max_pooling1d (GlobalMax (None, 64)           0           conv1d[0][0]
__________________________________________________________________________________________________
global_max_pooling1d_1 (GlobalM (None, 64)           0           conv1d_1[0][0]
__________________________________________________________________________________________________
global_max_pooling1d_2 (GlobalM (None, 64)           0           conv1d_2[0][0]
__________________________________________________________________________________________________
concatenate (Concatenate)       (None, 192)          0           global_max_pooling1d[0][0]
                                                                 global_max_pooling1d_1[0][0]
                                                                 global_max_pooling1d_2[0][0]
__________________________________________________________________________________________________
dense (Dense)                   (None, 2)            386         concatenate[0][0]
==================================================================================================
Total params: 5,031,234
Trainable params: 5,031,234
Non-trainable params: 0
__________________________________________________________________________________________________
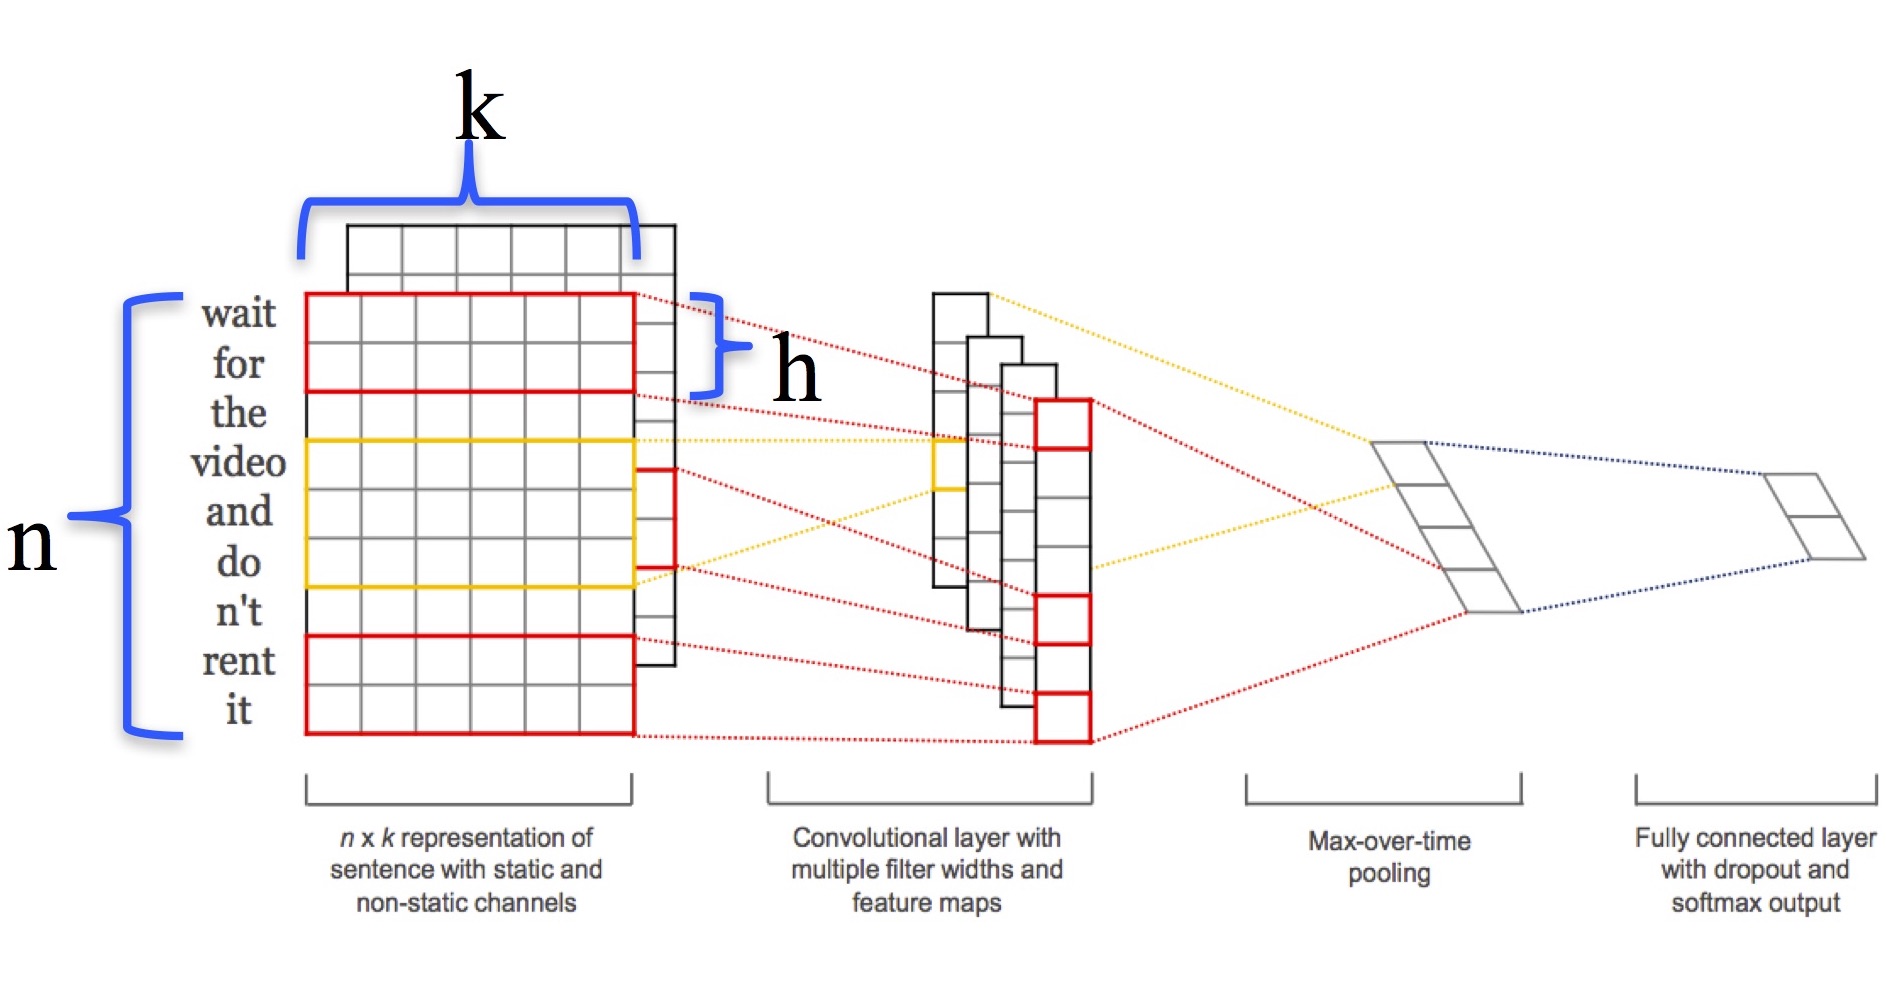
Conv1D 로 수행하는 텍스트분석 의미

상기 그림을 간략히 설명하면,
n : 1개의 token
k : embedding 차원
h : cnn_filters 위 예제에서는 3,4,5,6 의 필터들이다. 3 : token 3개씩 보겠다는 의미. 위 그림에서는 2개씩으로 표현되어 있다.
한 문장을 token 마디 3,4,5,6~ 으로 끊어서 지엽적으로 본다는 의미이며 이때 64개의 feature 맵의 크기는 (인풋길이 - 커널사이즈 + 1) 이다.
padding을 통해서 맞춘게 아니라면 feature map 끼리의 크기가 달라질 수 있는 것이다.이를 max-pooling 으로 더하여 총 64벡터로 이루어진 벡터가 FC로 전달되게 된다.
feature_map은 현재 64개로서, max_pooling 층을 통하여 나오게 되면 64차원의 벡터가 된다.
train_labels = np.array(train_labels)
val_labels = np.array(val_labels)
test_labels = np.array(test_labels)
naver_movie_CNN.compile(loss='sparse_categorical_crossentropy',optimizer='adam',metrics=['acc']) ## original은 adam 임
callback = tf.keras.callbacks.EarlyStopping(monitor='val_loss', min_delta=0, patience=1, verbose=0, mode='auto', baseline=None, restore_best_weights=False)

num_epochs = 50
history = naver_movie_CNN.fit(train_ids,train_labels,epochs=5,batch_size=100,validation_data=(val_ids,val_labels),callbacks=[callback])
Train on 50000 samples, validate on 10000 samples
Epoch 1/5
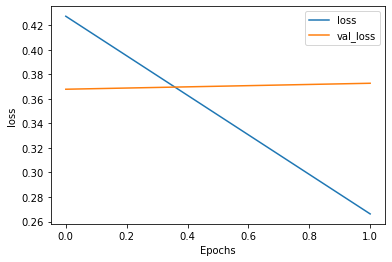
50000/50000 [==============================] - 20s 394us/sample - loss: 0.4272 - acc: 0.8043 - val_loss: 0.3678 - val_acc: 0.8362
Epoch 2/5
50000/50000 [==============================] - 17s 341us/sample - loss: 0.2662 - acc: 0.8947 - val_loss: 0.3726 - val_acc: 0.8409
import matplotlib.pyplot as plt

def plot_graphs(history, string):
    plt.plot(history.history[string])
    plt.plot(history.history['val_'+string])
    plt.xlabel("Epochs")
    plt.ylabel(string)
    plt.legend([string, 'val_'+string])
    plt.show()
plot_graphs(history, "acc")
plot_graphs(history, "loss")


naver_movie_CNN.evaluate(test_ids,test_labels)
10000/10000 [==============================] - 1s 95us/sample - loss: 0.3727 - acc: 0.8379


[0.3726586360692978, 0.8379]
준수한 결과임을 알 수 있다.
konlpy 토크나이징이 아닌 기본적인 음절(1개 단위로 끊어서 데이터 토큰화 이후 적용하기)
def tokenize(sent):
    white_space_removed = ' '.join(sent.split()) # 공백이 여러 개일 경우 하나로 변경
    return [s for s in white_space_removed]
import collections
from tqdm import tqdm
tot_tokens = 0
char_counter = collections.Counter() # 카운터

for dat in tqdm(train):
    sent = dat[1] ## real setence
    tokenized_sent = tokenize(sent)
    for cha in tokenized_sent:
        char_counter[cha] += 1
100%|█████████████████████████████████████████████████████████████████████████| 50000/50000 [00:00<00:00, 76730.67it/s]
chars = char_counter.most_common(len(char_counter))

vocab_list = ["[PAD]", "[UNK]"]
vocab_list.extend([c[0] for c in chars])
print(len(vocab_list))
2343
## Train, Val, Test 데이터에 대해 tokenize진행하기
Tokenized_train, Tokenized_val, Tokenized_test = [], [], []

for dat in train:
    Tokenized_train.append([dat[0], tokenize(dat[1]), dat[2]])
for dat in val:
    Tokenized_val.append([dat[0], tokenize(dat[1]), dat[2]])
for dat in test:
    Tokenized_test.append([dat[0], tokenize(dat[1]), dat[2]])
import os,sys
path = "D:/★2020_ML_DL_Project/Alchemy/dataset/text_output"
print(sys.path)
['D:\\★2020_ML_DL_Project\\Alchemy\\DL_Area', 'C:\\ProgramData\\Anaconda3\\envs\\gpu_test\\python37.zip', 'C:\\ProgramData\\Anaconda3\\envs\\gpu_test\\DLLs', 'C:\\ProgramData\\Anaconda3\\envs\\gpu_test\\lib', 'C:\\ProgramData\\Anaconda3\\envs\\gpu_test', '', 'C:\\ProgramData\\Anaconda3\\envs\\gpu_test\\lib\\site-packages', 'C:\\ProgramData\\Anaconda3\\envs\\gpu_test\\lib\\site-packages\\win32', 'C:\\ProgramData\\Anaconda3\\envs\\gpu_test\\lib\\site-packages\\win32\\lib', 'C:\\ProgramData\\Anaconda3\\envs\\gpu_test\\lib\\site-packages\\Pythonwin', 'C:\\ProgramData\\Anaconda3\\envs\\gpu_test\\lib\\site-packages\\IPython\\extensions', 'C:\\Users\\정진환\\.ipython']
sys.path.append(path)
from utils import TextEncoder,create_cls_feature
text_encoder = TextEncoder(vocab_list)
## TEST
sentence = "글자 단위 CNN 모델 만들기"
tokenized_sent = tokenize(sentence)
tokenized_id = text_encoder.convert_tokens_to_ids(tokenized_sent)
reverse_token = text_encoder.convert_ids_to_tokens(tokenized_id)
print(tokenized_id)
print(reverse_token)
[347, 60, 2, 190, 197, 2, 469, 833, 833, 2, 104, 1007, 2, 22, 34, 17]
['글', '자', ' ', '단', '위', ' ', 'C', 'N', 'N', ' ', '모', '델', ' ', '만', '들', '기']
MAX_LEN = 150

# TRAIN
train_ids, train_labels, label_map = create_cls_feature(Tokenized_train, text_encoder, max_seq_len=MAX_LEN, label_map = None)
# VAL
val_ids, val_labels, _ = create_cls_feature(Tokenized_val, text_encoder, max_seq_len=MAX_LEN, label_map = label_map)
# TEST
test_ids, test_labels, _ = create_cls_feature(Tokenized_test, text_encoder, max_seq_len=MAX_LEN, label_map = label_map)
Sentence with length = 0... continue ['5942978', [], '부정']
** 49999 examples processed
** Start creating features using label map
{'긍정': 0, '부정': 1}
Sentence with length = 0... continue ['2172111', [], '긍정']
** 9999 examples processed
** Start creating features using label map
{'긍정': 0, '부정': 1}
** 10000 examples processed
tf.keras.backend.clear_session()
import tensorflow as tf
from tensorflow.keras import layers
from tensorflow.keras import Sequential
from tensorflow.keras.layers import Input, Embedding, Conv1D, GlobalMaxPooling1D, Dense

vocab_size = text_encoder.vocab_size # 단어사전 개수
embedding_dim = 32 # 임베딩 차원
cnn_filters = [3,4,5,6]
num_feature_map = 64

""" Character embedding 적용 """
##  Input Layer 정의하기 (Hint: tf.keras.layers.Input)
text_input_ = tf.keras.layers.Input(shape = (None,),dtype='int32',name='text')
## Input Layer에 Embedding Layer 연결하기
embedding = tf.keras.layers.Embedding(vocab_size,embedding_dim)(text_input_)
print("shape after embedding:", embedding.shape, "\n")
""" CNN filter 적용하기 """
##  임베딩된 벡터에 CNN 필터 [3,4,5,6]을 각각 적용하고 MaxPooling을 적용하기
result_cnns = []
for i, kernel in enumerate(cnn_filters):
  print("Apply CNN filter {}".format(kernel))
  temp = Conv1D(filters = num_feature_map,kernel_size = kernel, activation='relu')(embedding)
  print(".. shape after Convolution:", temp.shape) ## Sequent length - kernel_size + 1
  temp = GlobalMaxPooling1D()(temp)
  print(".. shape after Max Pooling:", temp.shape)
  result_cnns.append(temp)
## 만들어진 feature map들을 concatenate하기
x = tf.keras.layers.concatenate(result_cnns, axis=-1)
print("\nshape after concat   :", x.shape)


""" 긍정/부정 분류하는 FCN 연결하기 """
## Dense layer를 이용해 긍정/부정 카테고리에 해당하는 점수 만들기
labels = Dense(2, activation="softmax")(x)
shape after embedding: (None, None, 32)

Apply CNN filter 3
.. shape after Convolution: (None, None, 64)
.. shape after Max Pooling: (None, 64)
Apply CNN filter 4
.. shape after Convolution: (None, None, 64)
.. shape after Max Pooling: (None, 64)
Apply CNN filter 5
.. shape after Convolution: (None, None, 64)
.. shape after Max Pooling: (None, 64)
Apply CNN filter 6
.. shape after Convolution: (None, None, 64)
.. shape after Max Pooling: (None, 64)

shape after concat   : (None, 256)

Char_CNN = tf.keras.Model(inputs=text_input_, outputs = labels)
Char_CNN.compile(loss='sparse_categorical_crossentropy',optimizer='rmsprop',metrics=['acc']) ## original은 adam 임
callback = tf.keras.callbacks.EarlyStopping(monitor='val_loss', min_delta=0, patience=1, verbose=0, mode='auto', baseline=None, restore_best_weights=False)

num_epochs = 10
history = Char_CNN.fit(train_ids,train_labels,epochs=5,batch_size=100,validation_data=(val_ids,val_labels),callbacks=[callback])
Train on 49999 samples, validate on 9999 samples
Epoch 1/5
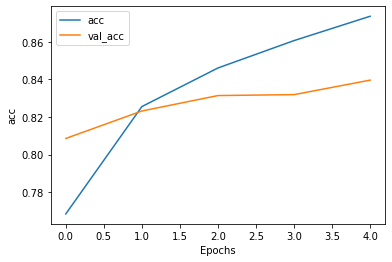
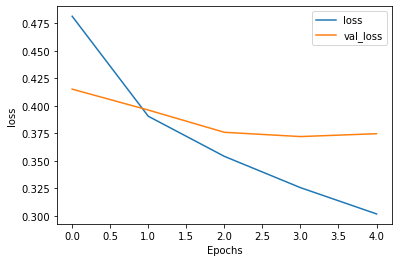
49999/49999 [==============================] - 6s 117us/sample - loss: 0.4813 - acc: 0.7685 - val_loss: 0.4151 - val_acc: 0.8086
Epoch 2/5
49999/49999 [==============================] - 5s 93us/sample - loss: 0.3904 - acc: 0.8255 - val_loss: 0.3961 - val_acc: 0.8232
Epoch 3/5
49999/49999 [==============================] - 5s 94us/sample - loss: 0.3540 - acc: 0.8461 - val_loss: 0.3758 - val_acc: 0.8314
Epoch 4/5
49999/49999 [==============================] - 5s 93us/sample - loss: 0.3255 - acc: 0.8606 - val_loss: 0.3719 - val_acc: 0.8319
Epoch 5/5
49999/49999 [==============================] - 5s 95us/sample - loss: 0.3016 - acc: 0.8736 - val_loss: 0.3745 - val_acc: 0.8396
plot_graphs(history, "acc")
plot_graphs(history, "loss")


Char_CNN.evaluate(test_ids,test_labels)
10000/10000 [==============================] - 1s 107us/sample - loss: 0.3709 - acc: 0.8402

[0.3708765195846558, 0.8402]
def inference(mymodel, sentence, cnn_filters):
    # 1. tokenizer로 문장 파싱
    parsed_sent = tokenize(sentence)

    # 2. vocab_dict를 이용해 인덱스로 변환
    input_id = text_encoder.convert_tokens_to_ids(parsed_sent)

    input_id = [input_id] ## 2차원이 들어가야 해서 [] 한 겹 더 씌움
    score = mymodel.predict(input_id)

    print("** INPUT:", sentence)
    print("   -> 긍정: {:.2f} / 부정: {:.2f}".format(score[0][0],score[0][1]))
inference(Char_CNN, "오프닝은 진짜 거지같다 생각했는데 끝으로 갈수록 손에 땀을 쥐며 봤네요", cnn_filters)
** INPUT: 오프닝은 진짜 거지같다 생각했는데 끝으로 갈수록 손에 땀을 쥐며 봤네요
   -> 긍정: 0.24 / 부정: 0.76
2가지 타입이 차이가 나는 이유가 뭘까?
텍스트 분석이 초짜라서, 좀더 고수에게 물어봤다. 이에 들은 답변을 중심으로 한번 정리해보면,
- 전체 단어사전의 크기가 차이가 있는데, embedding 차원을 동일하게 32 로 하는 것이 충분한 표현이 아닐 수 있다.
- conv1D 계층 3,4,5,6 은 애초에 1글자씩을 염두에 두었을때를 염두에 둔 모델이라 형태소 형태로 tokenize 되었으면, 2,3,4 형태의 filter size로 변환하는게 나을 수 있다.
로 정리할 수 있었다.
본 포스팅은 상기처럼 변경하고, 다시 돌린것임을 유념하면 됩니다.

Comments